I wrote this up for Briskoda some while back but posting this here given the renewed interest in the NQS BBK on this site.
First off, a big thanks to DaveB1970 and some of the guys on the mk5golfgti.co.uk forum whose ideas and wisdom I stole for this write-upDespite having added a bunch of modifications to my Mk2 VRS over the past 18 months, the only thing which has really bugged me was the OEM brakes. I guess it is each to his/her own but I have never felt happy with them and the final straw came when another buttock-clenching braking moment made me realise that this was one of the first mods that I should have looked at instead of chasing power-enhancing mods. So off I went to look at the options in more detail…
Of course, there are a bunch of options to look at from big Brembo or AP kits, etc coming in at £1200++ to getting the rear calipers of a Porsche 996 and sticking them on the front with a fitting kit or the tried and trusted R32 setup. I didn’t want to part with £££s so was sniffing around for some second hand R32 calipers on the various forums and ebay was the obvious choice.
That’s when I stumbled on this thread over on the MkV Golf GTI forum: http://www.mk5golfgti.co.uk/forum/index.php?topic=13985.0
where it is described as a not-quite-so-big-brake-kit (“NQS BBK”)
In short, DaveB, the resident forum break guru (or did he self-confess to being a “brake geek”?) had come up with an idea for putting 4-pot Porsche calipers on the MkV / VRS / etc. OK, nothing mind-blowing there…but…these calipers could be sourced for sub-£250 second hand and would use the standard 312mm discs!! Moreover, there is a whole range of pad choice including some respectable but pocket-friendly options.
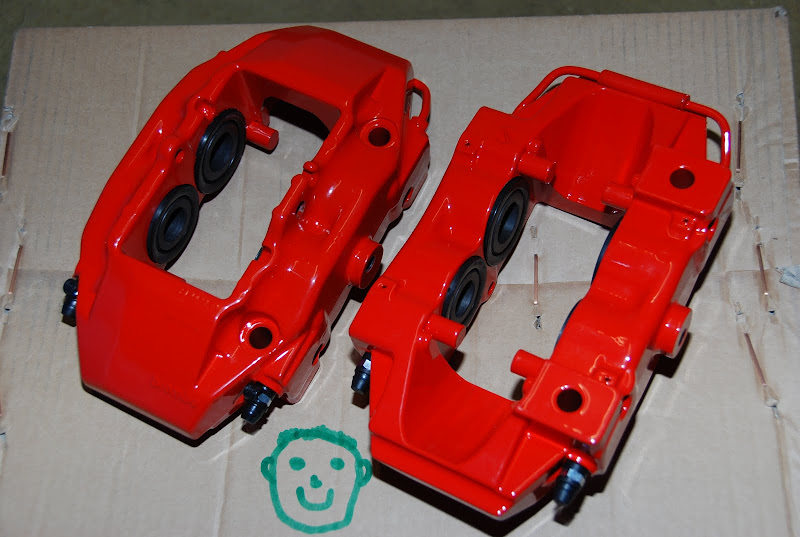
The calipers in question are those from the front end of a Porsche 986 / 987 Boxster / Cayman. The part number is 986.351.421 and 986.351.422 for the other side (those from the 996 Boxster and beginning with the 996.xxx part numbers are not what we are looking at here nor 986.352.XXX which are rear calipers). These calipers can even be picked up new from a (non-rip-offing) Porsche dealer for £395 for a pair!
Each caliper has the 4-pistons coming in at 36/40mm each side which is the same as the 996 Carrera 2 so they promised to be a performer even at the planning stage. This is opposed to the single piston (albeit a very big one) on the standard MkV/VRS or R32 setup.
I am not taking away from the benefits that can be gained from the R32 set-up but in addition to the 4-pots, another advantage is that these things are 1-piece alloy and are way lighter than the OEM or R32 calipers; you will have great difficulty doing this with a pinky on the iron VRS or R32 calipers:

DaveB can supply the fitting kit and brake lines for £225 so this set-up can be done for £250 for the calipers +£225 for the kit and then whatever cost for pads (say £50ish) and fluid should you need them. Edit: Please see more recent posts on this forum as I wrote this up a while ago and prices will have changedNB: Don’t pay more than £250 for the calipers and try to make sure that the dust seals on the pistons are in good condition and definitely make sure the pad-retaining pin and spring come with the calipers. Otherwise the dust seals are £11 a pair (and it could be up to 4 pairs if in bad nick although that would be very unlucky) and pad retaining kits are about £30 each or something daft like that. Knock that off the target price if it is an issue or walk away. The single pad wear sensor for the passenger side may be a bonus if thrown in if you wanted to splice that in the existing circuit but they are about £9 new. Another big bonus would be the anti-vibration (‘anti-squeal’) dampers if you can get them as these are also about £11 each from Eurocarparts and you’d need 4 of them – some folks have been OK with the usual copper grease or 3M anti-squeal stick on backing pads but I wasn’t; the Porsche anti-vibration dampers however, work a treat.
If you are painting or getting the calipers refurb’ed, the external appearance is probably not that important. I learned the hard way with the dust seals which was painful as the whole point about this project is keeping the cost down so, if in doubt, ask the seller!!
Despite the tin of Hammerite and best intentions, some work commitments and impatience meant that I took the easy route and sent my calipers to DaveB for a refurb. Here are the before and after pics:

One thing to note is that the Boxster calipers are to the rear of the disc on a Boxster but to the front of the disc on our vehicles i.e they will be upside down. This means that the bleed nipples would otherwise be at the bottom if simply moved around 180 degrees which ain’t ideal. To fix this, the fluid pipe on the left caliper must be removed and position to there the bleed nipples are on the right and vice versa (the geometry and bends of this bridging pipe mean that simply swapping the bleed nipples for the pipe on the individual caliper is not the best way). Getting them off was a bit tricky with the soft bolts but DaveB recommends mole grips and brute force rather than a spanner to crack the bond initially (although he will do this if you send to him for a refurb’); it is still easy to chew the bolts for the caliper bridges but I filed them back to a respectable look.

Swapping left caliper to the right on the car isn’t the answer either as the smaller piston would be to the bottom and it should be the one that ‘sees’ the disc before the larger piston i.e. it should be the leading piston to give a more progressive pedal feel.
The only other thing that needs to be done to the calipers is for a couple of mm max of the pad-retaining pegs in the calipers to be filed / Dremelled / ground down to accommodate the 25mm thickness OEM disc rather than the 24mm Porch disc. This should be easy with the soft alloy metal ( pic above and below courtesy of DaveB1970):

OK, on to a simple ‘How to’ guide:
In addition to the usual jack / axle stands, you’ll need a decent socket set and preferably a torque wrench or something to give a bit of leverage as some force is needed to remove the existing caliper carriers. iirc it is a 21mm socket for those bolts. A large (Size 10 iirc) socket hex bit is needed to bolt the new calipers on and a combination of 15mm and 17mm spanners to remove the old brake line and 14mm and 17mm to attach the new ones I may have those spanner sizes a bit wrong as doing this from memory). The only other spanner is that to loosen the bleed nipples (and the small torx bit to remove the screw that holds the disc in place if you plan to change the discs). Plus a screwdriver to prise off a couple of clips that secure the OEM brake line to the car.
My Halfords socket set had everything I needed although the larger torque wrench came in handy. I chose to do my discs at the same time as the old ones had seen better days:

With the front of the car up in the air and secured by axle stands and the wheels off, the first thing to tackle is the two bolts holding the OEM caliper carriers as these can be removed with the existing calipers still attached.


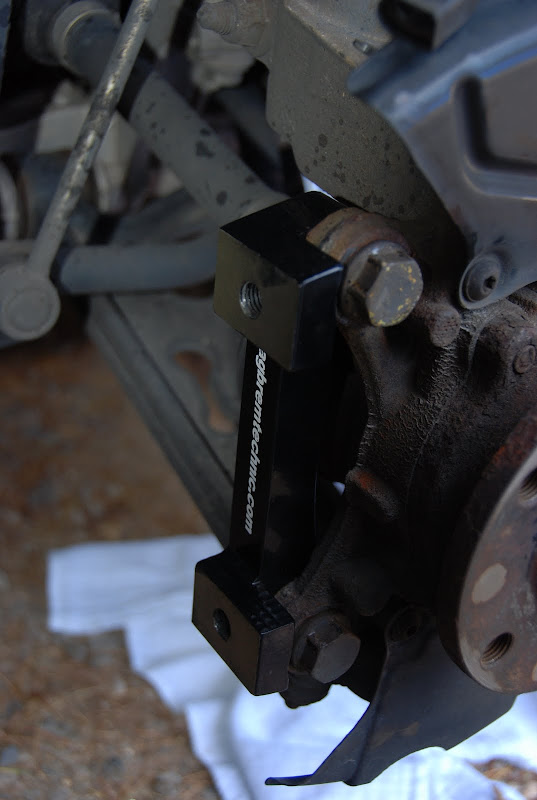
The new caliper carriers supplied in the kit can now be attached with a bit of muscle (and a bit of Loctite if you feel inclined; I didn’t) with the bolt going from the disc side (rather than the back as per OEM carriers). I found that the layer of powdercoating on the new carrier combined with the rust/muck on my hub made the interface between the new carrier and hub (red arrow on piccy) a fraction of a mm out for a perfect line up with the bolts on one side – a bit of a file sorted this in a few seconds

Next is to disconnect the OEM brake line. Before starting this, I wanted to minimise the loss of brake fluid on to my drive way. I did this by putting some doubled-over cling film over the fluid reservoir and securing with a cap (in my case the cap for the Gunson Eezibleed which I use later to bleed the new calipers) to create a vacuum. I also found that the cap from a car/bike Schrader valve produced a nice fitting cap to plug the new braided lines supplied by DaveB. I don’t expect it would pour out but this kept the fluid loss to a minimum.


All that needs doing is to use two spanners to remove the unclipped brake line and a quick swap-over to the new braided line.

If you are swapping the disc for a new one, it needs to go on now as they can’t be installed / removed with the calipers attached.
Make sure the caliper pistons are fully pressed in (you’ll see why later). The calipers then bolt on with the hex socket. Note that there is plenty of space between the previously filed down pad-retaining pegs in the calipers and the disc!

Now connect the new brake line to the caliper and tighten up when you are happy that it is all pointing where you want it to go and clip the line back at the point where the new line connects with the car (there is a second clip down nearer the hub that is used to clip-on the OEM line at a second point but that is no longer needed).
Assuming your disc is nice and clean with no oil or whatever on it, the brake pads (and anti-squeal dampers and wear sensor on U.K. passenger side if you chose to use one) can be fitted. I found it easier to loosen the disc-retaining screw to give a bit of slack on the disc and squeeze the new pads into place. Given that these calipers and pads usually go on a 24mm wide Porsche disc, it is quite a tight fit with our 25mm discs thus the reason for ensuring those pistons were fully pressed in. However, the disc should travel reasonably freely and just be ‘skimmed’ by the new pads.
The pad retaining spring is pushed on to the pads and the cotter pin slid through with an ‘R-clip / pin’ fixed through the cotter pin to hold everything in place.

Job done!
All that needs to be done now is to move on to the other side and repeat the process and then bleed the new calipers before the wheels go on. Bleed the calipers inside nipple first and push sufficient brake fluid through; tapping with a mallet helps ensure that air bubbles and bits are pushed out. There are plenty of guides on bleeding brakes (and clutch nipple if you want to while you’re at it) so I’ll leave the details out.
Just one bit of advice for those with newly repainted / refurb’d calipers – keep some soapy water handy and wash off any brake fluid that gets on to the caliper…Here's what happened when I was stupid enough not to tighten one of the bleed nipples before attaching the brake line and didn't notice for a few minutes


The calipers have plenty of clearance with 18” Octavia Zenith alloys without the need for any spacers although I can’t be sure with others. Interestingly, the new pads have a very similar contact area with the discs but leave the inside 10mm of the disc untouched.


This set up may not compete with the massive 6 or 8-pot big brake kits used by some of the serious track-day enthusiasts but I don’t think that it would be too far off it. It has been tried on the track by a few of the MkV Golf GTI boys and they rate it highly. Furthermore, this set up isn’t intended to compete with the racing BBKs, it is intended to give an excellent alternative to OEM calipers and do it at as low a cost as is possible. I couldn’t honestly say how it compares with the R32 set-up as I haven’t been able to do a direct comparison. What I can say, is that this set-up with decent pads is leaps ahead of the OEM brakes and I am a very happy bunny!

[/size]

