Make a donation

Author Topic: ChrisGT's Black 5 door GT TDI 170  (Read 81764 times)

Offline ChrisGT

  • Always Involved
  • ****
  • Thank You
  • -Given: 39
  • -Receive: 40
  • Posts: 379
  • My Ride: http://www.mk5golfgti.co.uk/forum/index.php/topic,106577.0.html
Re: ChrisGT's Black 5 door GT TDI 170
« Reply #60 on: July 29, 2016, 01:56:13 pm »
Had a quick break in the rain so opened up the fuel filter canister and could see the filter straight away (the first time I had to syphon out quite a bit of fuel before I could see the filter).

The Fuel is much clearer although still quite cloudy and dark so didn't look that different in the couple of pictures I managed to get. Going to run a few more tanks of fuel through and then check it again and once it's cleared up more then I'll change the filter again. It was very contaminated to start with so going to take a while to get it all out of the system but feeling pretty good that it's improving  :jumpmove:

Chris
It wouldn't be fun if it was easy, I just wish it wasn't this much fun.

Offline doylebros

  • Just look at my post count
  • ******
  • Thank You
  • -Given: 44
  • -Receive: 309
  • Posts: 2775
Re: ChrisGT's Black 5 door GT TDI 170
« Reply #61 on: July 29, 2016, 05:17:01 pm »
You'll be pleased with that then - give it another 1000 miles and change the filter again and you'll see a great improvement on the following inspection.

Offline ChrisGT

  • Always Involved
  • ****
  • Thank You
  • -Given: 39
  • -Receive: 40
  • Posts: 379
  • My Ride: http://www.mk5golfgti.co.uk/forum/index.php/topic,106577.0.html
Re: ChrisGT's Black 5 door GT TDI 170
« Reply #62 on: July 29, 2016, 05:40:26 pm »
Thanks mate, Yeah that's the plan. It's definitely better than it was so hopefully the rest of the contamination will go over the next few tanks of fuel. Pleased the car isn't using oil anywhere near as much as it was too  :happy2:

Chris
It wouldn't be fun if it was easy, I just wish it wasn't this much fun.

Offline ChrisGT

  • Always Involved
  • ****
  • Thank You
  • -Given: 39
  • -Receive: 40
  • Posts: 379
  • My Ride: http://www.mk5golfgti.co.uk/forum/index.php/topic,106577.0.html
Re: ChrisGT's Black 5 door GT TDI 170
« Reply #63 on: August 06, 2016, 01:58:30 am »
Got a couple of little things done on the golf this evening.

Replaced the bolt that holds the windscreen washer fluid filler tube. It's the first thing I noticed when I opened the bonnet for the first time and has driven me nuts ever since. officially It's an M6 x16 bolt although it does stick out the back of the bracket a bit so could be a few mm shorter. I used a stainless steel flange hex head bolt which is fine although not quite as big as the washer on the original it makes no odds as there is no weight on it so it's supported enough. Also had a quick clean around the area too.


It wouldn't be fun if it was easy, I just wish it wasn't this much fun.

Offline ChrisGT

  • Always Involved
  • ****
  • Thank You
  • -Given: 39
  • -Receive: 40
  • Posts: 379
  • My Ride: http://www.mk5golfgti.co.uk/forum/index.php/topic,106577.0.html
Re: ChrisGT's Black 5 door GT TDI 170
« Reply #64 on: August 06, 2016, 02:36:12 am »
I also bought some new number plates as the old ones looked a bit scabby and I don't like the border on them. I think it looks much neater without them, it's not easy to see in the pictures but the border is dark green and just looks out of place. The old front plate had partly come off at one side as the sticky pads had given up so put quite a few extra on the new plate to make sure it stays stuck on.

New plates:


Lots of sticky pads!


Old plate, hanging off at left side:


Old plate removed and new plate ready to go on:


What was left of the old sticky pads:


I used Autofinesse obliTARate to remove what was left and then used Meguiar's APC to clean the area, followed by Gtechniq panel wipe to make sure the surface was as clean as possible to ensure a good bond with the new sticky pads, which left me with this:


So here's a before:


And after:

« Last Edit: August 06, 2016, 02:45:07 am by ChrisGT »
It wouldn't be fun if it was easy, I just wish it wasn't this much fun.

Offline ChrisGT

  • Always Involved
  • ****
  • Thank You
  • -Given: 39
  • -Receive: 40
  • Posts: 379
  • My Ride: http://www.mk5golfgti.co.uk/forum/index.php/topic,106577.0.html
Re: ChrisGT's Black 5 door GT TDI 170
« Reply #65 on: August 07, 2016, 02:11:59 am »
The engine cover had never sat right as a couple of the little rubber mounts that hold it in place were missing and a couple were torn so weren't really doing anything. Managed to find a set of 6 brand new ones on ebay for a few quid and fitted them today, much more secure now and sits where it's meant to.

Here's a link if anyone else is needing some: http://www.ebay.co.uk/itm/172234373141?_trksid=p2060353.m2749.l2649&ssPageName=STRK%3AMEBIDX%3AIT

Picture of one of the old ones and a new one:

It wouldn't be fun if it was easy, I just wish it wasn't this much fun.

Offline ChrisGT

  • Always Involved
  • ****
  • Thank You
  • -Given: 39
  • -Receive: 40
  • Posts: 379
  • My Ride: http://www.mk5golfgti.co.uk/forum/index.php/topic,106577.0.html
Re: ChrisGT's Black 5 door GT TDI 170
« Reply #66 on: August 16, 2016, 03:36:19 am »
Had a really productive day on the golf today and got a few jobs done. Before I go further I must give a massive thanks to my friend Matt who's help meant I could actually get this job done.  :drinking:

So today I gave the car an oil + filter change, changed the inlet manifold to the alloy one from the pd140, cleaned out my egr valve/ASV and also blanked off my EGR. Here are some pics of the day along with a few little descriptions of what's happening in each picture. I wanted to write this post of my experience for anyone else considering changing the BMN pd170 inlet manifold (with swirl flaps) for the BKD pd 140 inlet manifold (no swirl flaps) as there isn't really that much info on doing this job.

So first off this is how the car started today. The car was a little lumpy at idle although nothing too bad but just hesitated slightly and shuddered a little.

We started by jacking up the car, removing the belly pan and dropping out the oil, we left it to drip out as we did the rest of the work on the car and filled it up once we'd finished all the other jobs, I didn't take any pictures as you all know what an oil change looks like.

In this picture then I have already removed one of the engine cover brackets, taken the bolts out of the egr pipe connecting it to the egr valve and moved a few electrical connections and pipes out of the way. By far one of the most awkward parts of the whole day was trying to get the one bolt that holds the egr pipe to the engine block as it's super hard to get to/see. This had to be removed though so that there was enough give (and only just enough give!!) to get to the bolt connecting the egr valve to the inlet manifold which is obscured by the egr pipe. Said awkward bolt is not pictured but if you follow the egr pipe from the valve down to the engine block you will find it tucked away under the inlet manifold and half obscured by coolant pipes...  :stupid: Access for tools was slightly improved by removing some of the air intake.
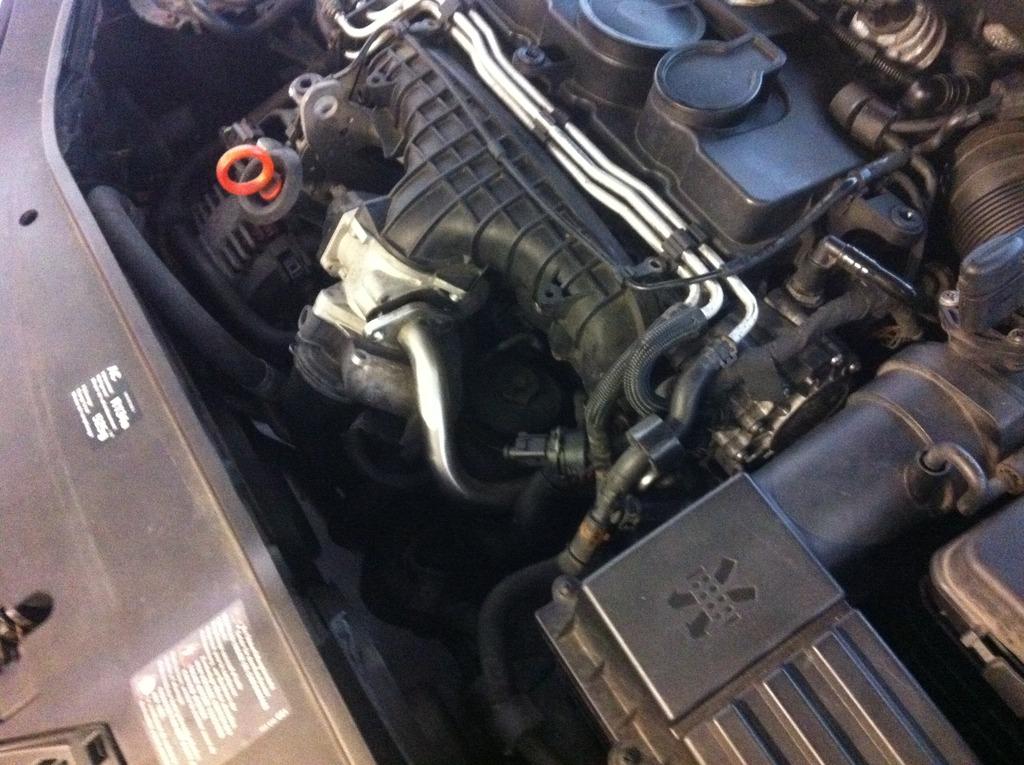


The three torx bolts that hold the egr valve/asv to the inlet manifold were awkward but manageable using different combinations of extension bars etc, the one obscured by the egr pipe was the most time consuming and required two people, one to hold the egr pipe out the way, leaving the other person two hands to get the torx bit into the bolt and undo it. This was made harder on my car because someone had knackered the head on that torx bit...  :slap:

Once the egr valve/asv was off we were met with this lovely gungy mess:
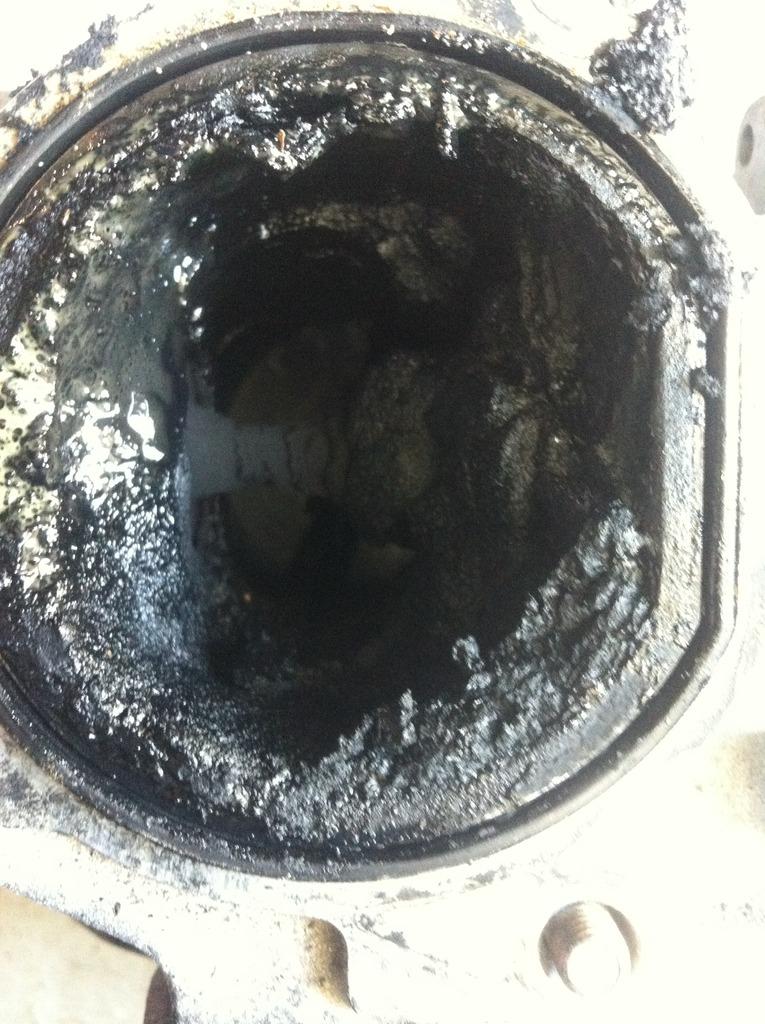


For anyone who has been reading my thread then you'll know I have only recently sorted a problem with the tandem pump leaking oil into the fuel system meaning the car was burning a lot of oil, I guess this accounts for some of the gunky mess but this is the main reason I wanted to block off the egr, this horrible exhaust crap should not be going back through the engine...

Anyway, all cleaned up using a flat bladed screw driver and various brake/carb cleaners etc it came up like this:
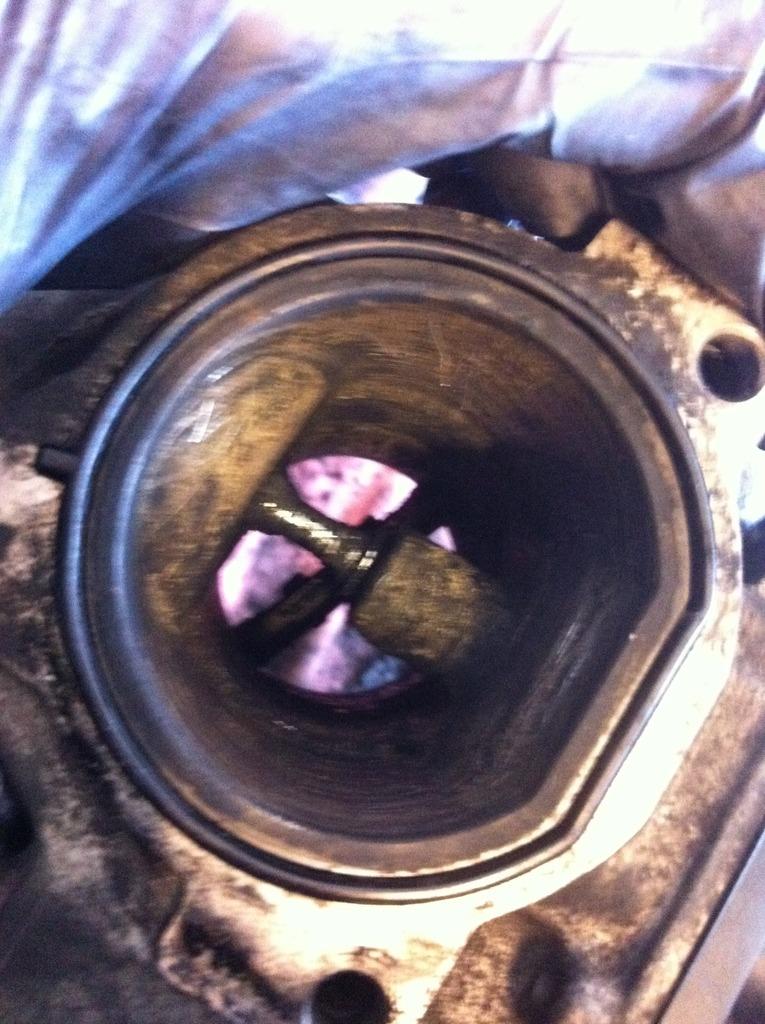


Not perfect but a lot better than it was.

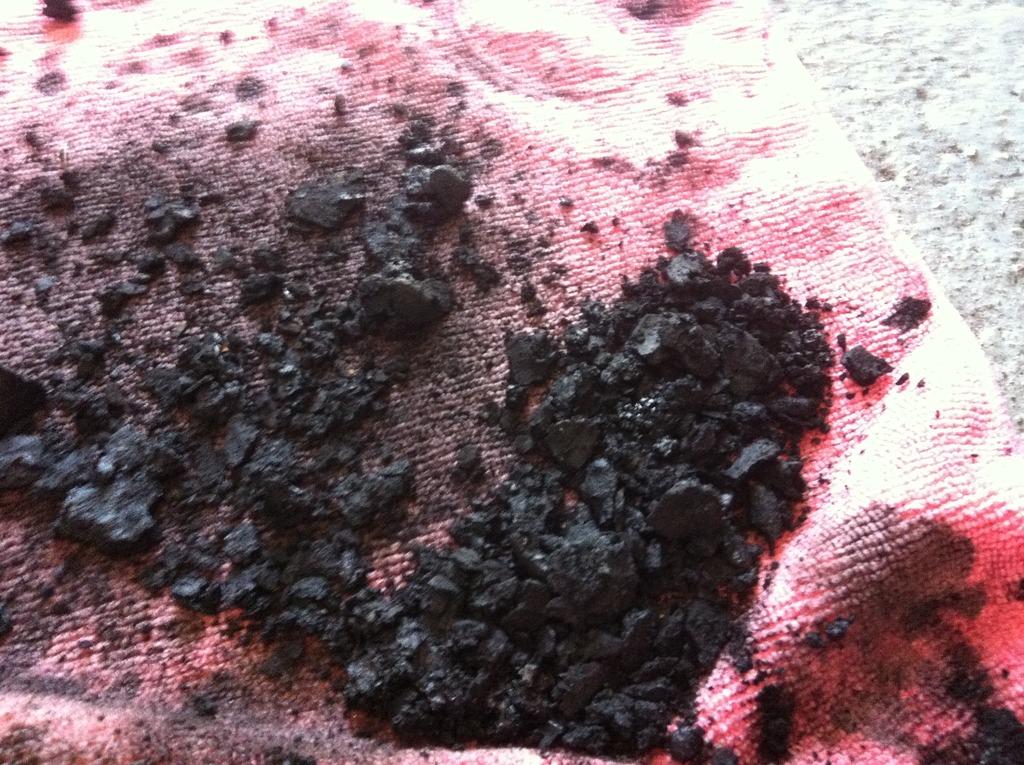
Here's just some of the stuff that came out of it:


With the egr valve removed it gave us access to the rest of the bolts securing the inlet manifold to the engine block.


It took quite a while to clean out the inlet on the inlet manifold to find the bolt hidden inside the manifold itself... stupidest place for a bolt ever... A couple of the other bolts were awkward to get to but a bit of patience and trying various combinations of tools/extensions they all came out leaving is this:
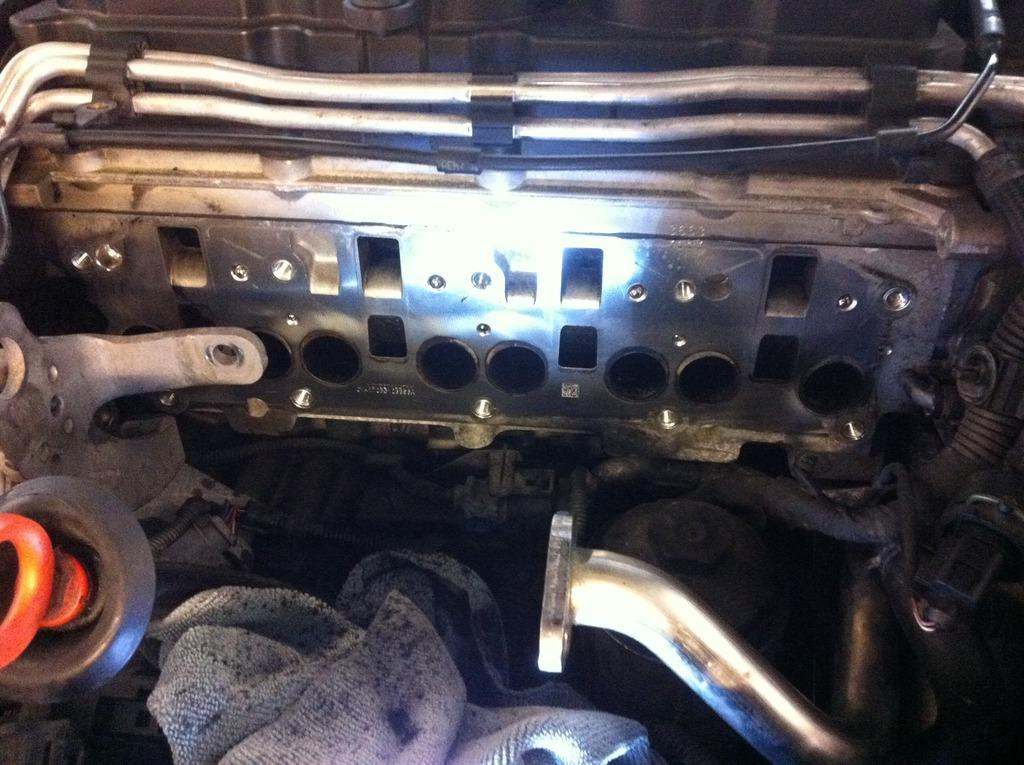


This is the inside of the old inlet manifold, you can see it's all gunged up like the egr/asv:


In the picture you can see the swirl flap on the left is all covered in stuff stopping it from working properly, there was slight play in the shaft that holds the flaps and runs right from one end of the manifold to the other which suggests it was definitely not working as it should.

This picture shows the swirl flap actuator which has been leaking pressure out of the inlet manifold. You can tell because the horrible gunky residue has been blown out of the intake seal and covered that side of the manifold and engine cover bracket.


So, fitting the new manifold. The kit I got from darkside developments comes with a used but aqua blasted pd140 intake manifold, a metal gasket (not rubber like the pd170) and also 5 new bolts with washers which are used for the bottom row of intake manifold bolts as the ones from the pd170 manifold are slightly too long.

Here's a link to the kit I bought which costs £95 rather than a new plastic pd170 manifold with swirl flaps which will set you back at least £360 (I have seen them advertised for over £500 though...): http://www.darksidedevelopments.co.uk/products/ppd170-used-bkd-aluminium-inlet-manifold-conversion-kit.html

So, it is also worth noting that the bolt which sits inside the intake manifold (the one that was hard to find under all the gunge) had a slight shoulder on it which needed to be ground away in order for it to sit inside the hole in the alloy manifold. We did this by wrapping some insulating tape around the thread of the bolt and putting in a drill, then used the drill to spin the bolt on a file to grind down the edge neatly and evenly. Worked pretty well.

So here's the new manifold in place:


Now the fun really begins...  :doh:

Once the manifold was in place and a few of the bolts put in then we had to start modifying some of the other parts to get them to sit right as the alloy manifold has a slightly different outer profile in some places. This meant that the brackets which hold the engine cover some clips for pipes and electrical connectors and also the swirl flap actuator had to be adapted to fit.

First the left hand side, which holds the swirl flap actuator. This bracket had to be modified the most. We cut off the leg that went down to the bottom bolt as it was nowhere near the bottom bolt now. What we figured was that now the swirl flap actuator had been got rid of all that bracket was doing now was holding that corner of the engine cover and has one electrical sensor attached to it so it really didn't need much bracing. It is also connect by a bolt to the oil level dipstick which is fairly stiff so helps support the bracket as much as the bracket supports it. So, the lower leg was removed. The top part where the other bolt goes into the top row of intake bolts had to be modified like this in order to sit where it was before:
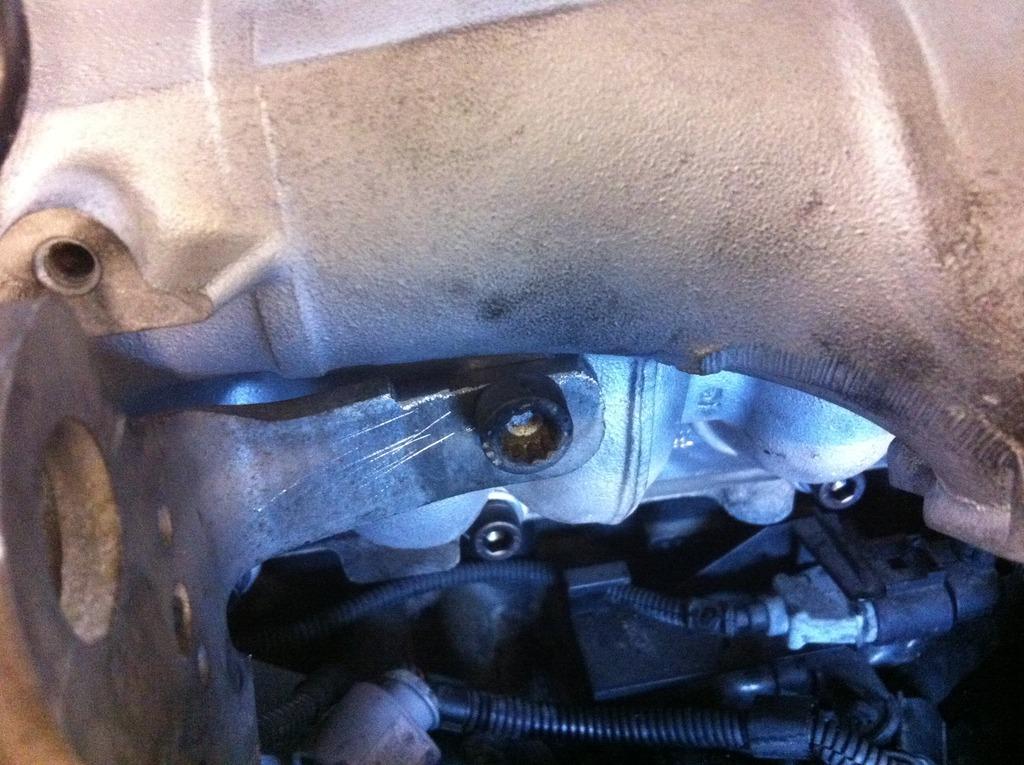


We used a hacksaw and a file to modify it and it worked ok.

Now, the bracket on the other side required quite a bit more work although less was actually removed. In the next picture you can see where we had to cut out two V shapes so that the bracket didn't foul on the manifold casing:


I am happy to report that the brackets both support the engine cover as they did before.

Once the brackets were modified and the bolts all in securing the new manifold to the engine block then we refitted the now cleaned egr valve/asv and connected all the various wires/pipes etc from where they were before.

I took this chance to block off the egr pipe while I had it apart and it was all clean, I used a blanking plate I got from Darkside developments. The reason I wanted to blank it off here but keep the pipe etc is so that it still looks roughly stock to anyone having a look. The blank is pretty chunky so was a bit of a fight to get the pipe to line up correctly with the bolt holes, partly as the new manifold sets the pipe off very slightly, Anyway, the original two bolts that hold the egr pipe to the egr valve were too short so I used two of the old intake manifold bolts that had been on the bottom row and had been replaced. I had to cut them down slightly as they were too long but they worked perfectly and made sure there was plenty of the bolt holding it all together. The horrible awkward bolt that holds the egr pipe to the engine casing was now quite a bit out of position so that was left out. Honestly though the pipe isn't going anywhere and is completely solid where it is.

The last thing to do was to block off the vacuum pipe that operated the swirl flap actuator. I did this by bending it back on itself and tightening a cable tie around it. Ideally I'll get something to put in the pipe to block it properly but to be honest it's not leaking the way it is so not too worried.

Here are a couple of picture s of the finished job:

egr pipe with blanking plate:


Modified left bracket with vacuum pipe blocked off (although I hadn't clipped it back onto the bracket in this picture):


Right side bracket which holds a couple of coolant pipes and fuel pipes in place as well as supporting the engine cover:
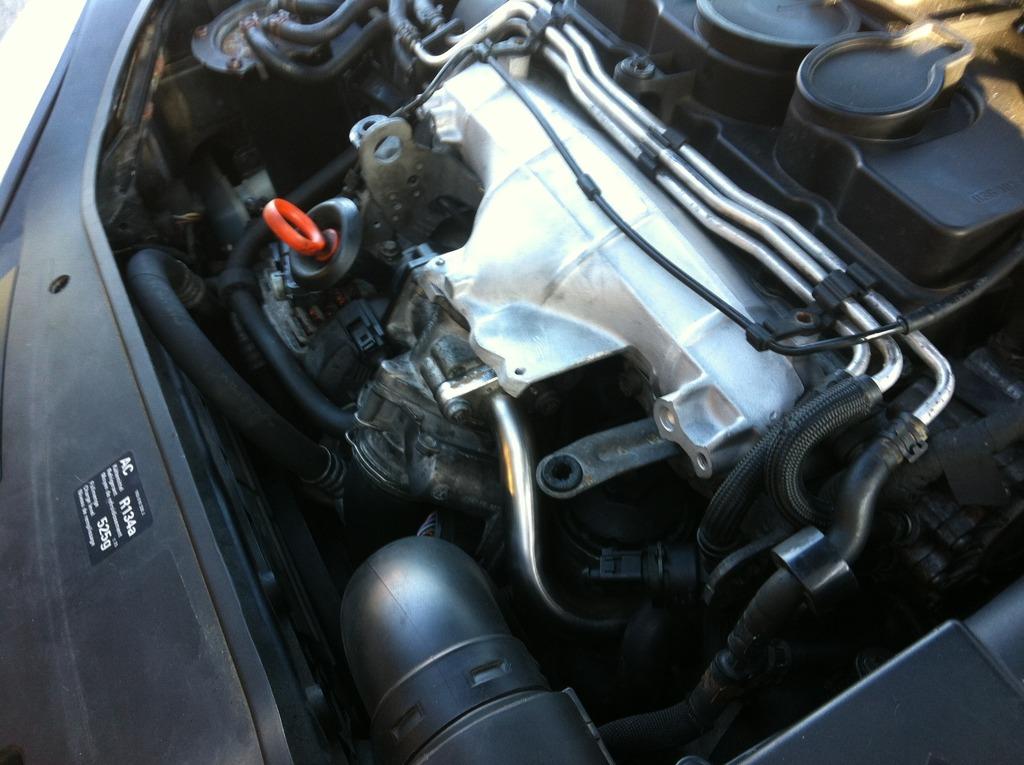


The car blew out quite a bit of white smoke for the first couple of miles but it cleared up pretty quickly, I'm guessing it was just from disturbing the gunk that was in there and letting it burn through a bit. It idles much better and feels like it pulls a lot better lower down the rev range, the engine management light came on after about 20 miles but that was expected due to the egr being blocked off and it's getting mapped out soon so not worried about that.

Thanks for reading if you got this far and hope some of the information might be handy to anyone else thinking of this mod.

Cheers,

Chris

Edit May 2017: I have just done another oil and filter change and having the alloy inlet manifold compared to the standard plastic one does make getting the old filter out a little more tricky as it sits closer to the cap for the oil filter. What we had to do was unscrew the oil filter cap and then separate the filter from the cap before it could be removed from the canister, awkward but manageable. I would also note that the bolts supplied by darkside developments for fitting the manifold have all rusted quite badly compared to the original bolts. Overall I'm still happy enough with the kit and it's still been cheaper than replacing the plastic manifold but just want people to know what's really involved as it's not quite as straight forward as unbolting the old one and bolting the alloy one on.

Chris
« Last Edit: May 20, 2017, 03:09:17 pm by ChrisGT »
It wouldn't be fun if it was easy, I just wish it wasn't this much fun.

Offline Andy

  • Admin
  • Just look at my post count
  • *
  • Thank You
  • -Given: 39
  • -Receive: 443
  • Posts: 10931
    • Email
Re: ChrisGT's Black 5 door GT TDI 170
« Reply #67 on: August 16, 2016, 08:16:54 am »
Good write up Chris.it's surprising how much crap gets in there

Offline ChrisGT

  • Always Involved
  • ****
  • Thank You
  • -Given: 39
  • -Receive: 40
  • Posts: 379
  • My Ride: http://www.mk5golfgti.co.uk/forum/index.php/topic,106577.0.html
Re: ChrisGT's Black 5 door GT TDI 170
« Reply #68 on: August 16, 2016, 08:26:17 am »
Thanks Maxitrol, much appreciated.

I wanted to let people know what's really involved with this as it's hard to find much info on it. Took us about 4 and a half hours from meeting at his garage to driving away again. We both had a lot of different tools with us too and think we tried every combination of extension bars/bits to get to some of the bolts. haha. A lot of the time was spent modifying the brackets to fit the new manifold.

Car blew out a bit more white smoke this morning but cleared up after about 2 minutes of driving. Can't wait to the remap done now!

Also in the process of buying some new wheels and have been exploring the options for upgrading the stereo. Nothing fancy but think I'm going to go for an rcd510 with Aux/usb in down by the gearstick.

Chris
It wouldn't be fun if it was easy, I just wish it wasn't this much fun.

Offline ChrisGT

  • Always Involved
  • ****
  • Thank You
  • -Given: 39
  • -Receive: 40
  • Posts: 379
  • My Ride: http://www.mk5golfgti.co.uk/forum/index.php/topic,106577.0.html
Re: ChrisGT's Black 5 door GT TDI 170
« Reply #69 on: August 17, 2016, 01:51:32 am »
After getting all that work done yesterday it gave me the itch to get more done, so today I had some spare time I decided to fit my short shifter.

I bought the OEM S3/Golf R short shifter from darkside developments for £30. Here's the link to the part: http://www.darksidedevelopments.co.uk/products/genuine-02q-6-speed-gearbox-short-shift-kit.html

I bought this after I had just come off nightshift and was feeling a little devil may care. It's never a good idea to spend money when you're tired... just like you should never go food shopping when hungry. Anyway, It's a mod that half of me thinks is completely awesome and the other (possibly more sensible) half of me thinks is completely pointless.

Does it increase performance... no. My quick gear changes might be the smallest fraction of a second quicker but It is very rare that I try and change gear super quickly as I was brought up to have mechanical sympathy. In order to be fast you have to smooth etc, so jamming gears in as fast as possible and dumping the clutch just has no appeal to me. So if it's not performance it must be cosmetic... well, no again as no one can see the nice new shiny linkage... So any real benefits? Well, there is less throw on the gear stick which feels really nice and other than that then not as far as I can see.

Was the mod worth the £30 I spent... Honestly, no. The throw on the standard golf gear stick really isn't that bad but then I'm coming from a ford fiesta which had a throw measured in meters not cm.

The money aside and the boy racer who claims he can change gear faster than his friends down the pub as far aside as possible, I do like the mod. It feels tight and sharp and I had fun working on my car in the sunshine  :smiley:

So, I know you just came her for pictures so here you go.

I followed this guide on how to do the job, Colin might come across a little simple but he does give good clear instructions  :laugh:


I removed the engine cover, air intake and filter housing to give me access to the shifter. As in the video above some people remove the battery box, however I had plenty access with that all left in place.


You can see in the top left of the picture one of my Bergen hose clip pliers/clamps. They are brilliant and make removing spring clips super easy, I got my set on ebay. Here's the set which includes a super long reach one which is super handy for stuff down the back of the engine or places where there is no room for the actual pliers to be used:


Anyway, I followed the video and removed the two little securing clips and then the one bolt that secures the linkage. I made sure the gearbox was in neutral and then, as in the video, push down slowly and then pull up on the linkage sharply to break it free, took a couple of tries and it popped off no bother.

Old and new:


And new one in place with bolt and clips back on:


I put some grease on the parts that move and in the runner on the right hand side where the other part of the linkage slots in.

All put back together and a quick wipe down:


Going to try and do something with that sound deadening stuff at the bulkhead as it's all falling down...

Kind of hard to get an accurate picture but here is the car in 4th gear before the mod:


and here it is after:


angle of the picture isn't exactly the same so makes it look like there's been more difference than there actually has.

As I said, nice to do some work on the car, mod probably not worth the £30 but it's done now and it does feel better than standard.

Chris

It wouldn't be fun if it was easy, I just wish it wasn't this much fun.

Offline bad devotions

  • Always Involved
  • ****
  • Thank You
  • -Given: 19
  • -Receive: 22
  • Posts: 342
Re: ChrisGT's Black 5 door GT TDI 170
« Reply #70 on: August 17, 2016, 11:04:01 am »
nice work on the engine cleaning bits! wish i knew how to do stuff like that! i

Offline ChrisGT

  • Always Involved
  • ****
  • Thank You
  • -Given: 39
  • -Receive: 40
  • Posts: 379
  • My Ride: http://www.mk5golfgti.co.uk/forum/index.php/topic,106577.0.html
Re: ChrisGT's Black 5 door GT TDI 170
« Reply #71 on: August 17, 2016, 01:54:13 pm »
nice work on the engine cleaning bits! wish i knew how to do stuff like that! i

Thanks BD, a lot of it just takes time, patience and perseverance. Loads of information online on how to do most things and if you get stuck you can always ask for help  :happy2:

Get stuck in you'd probably enjoy it  :smiley:

Chris
It wouldn't be fun if it was easy, I just wish it wasn't this much fun.

Offline ChrisGT

  • Always Involved
  • ****
  • Thank You
  • -Given: 39
  • -Receive: 40
  • Posts: 379
  • My Ride: http://www.mk5golfgti.co.uk/forum/index.php/topic,106577.0.html
Re: ChrisGT's Black 5 door GT TDI 170
« Reply #72 on: August 17, 2016, 10:57:18 pm »
Nice little run this evening and got a photo of the golf, really needs a front ed30 splitter:


Chris
It wouldn't be fun if it was easy, I just wish it wasn't this much fun.

Offline ChrisGT

  • Always Involved
  • ****
  • Thank You
  • -Given: 39
  • -Receive: 40
  • Posts: 379
  • My Ride: http://www.mk5golfgti.co.uk/forum/index.php/topic,106577.0.html
Re: ChrisGT's Black 5 door GT TDI 170
« Reply #73 on: August 22, 2016, 02:58:14 am »
Woohoo! New wheels have arrived!  :jumpmove:

Big thanks to @john87  for the smooth transaction and honest description of them. Got to love the forum when people use it properly  :drinking:


Going to give them a polish and then seal them with either Gtechniq C1 or Crystal Serum lite as I have both but not sure I have enough CSL left to do all four wheels... Will see what happens. Then will top them off with Exov2 to keep them super easy to keep clean.

Chris
It wouldn't be fun if it was easy, I just wish it wasn't this much fun.

Offline ChrisGT

  • Always Involved
  • ****
  • Thank You
  • -Given: 39
  • -Receive: 40
  • Posts: 379
  • My Ride: http://www.mk5golfgti.co.uk/forum/index.php/topic,106577.0.html
Re: ChrisGT's Black 5 door GT TDI 170
« Reply #74 on: September 06, 2016, 12:08:22 pm »
Bought myself a VCDS kit, it's second hand from someone local but it's like new. There are a few things I'd like to change like changing the locks so that one click of the button opens all the doors rather than just the drivers door etc. I also wanted to be able to scan for faults myself as I plan on doing most of the work to the car myself.


So if anyone in Shetland needs a scan then give me a shout  :happy2:

Chris
It wouldn't be fun if it was easy, I just wish it wasn't this much fun.