Make a donation

Author Topic: Diverter Valve (Including GFB DV+) How To With Photos on K03  (Read 44809 times)

Offline lukemk5gti

  • Just look at my post count
  • ******
  • Thank You
  • -Given: 28
  • -Receive: 118
  • Posts: 1845
    • Email
  • My Ride: http://www.mk5golfgti.co.uk/forum/index.php/topic,89715.msg907250.html#msg907250
Diverter Valve (Including GFB DV+) How To With Photos on K03
« on: August 21, 2014, 09:27:38 am »
Let me start by saying I bought my car around 10 months before replacing DV. Since I bought the car with a torn DV and I hadn’t driven another GTI I didn’t even know it was gone because a 2L engine is still very powerful. Whenever I put the foot down I would hear a whistle which I was sure was my turbo but even though it pulled, it never pushed me to the back of the seat. After driving another GTI just last week I was reassured that something was definitely out of place so I said I’d tackle the DV. That loud whistle would have been the air escaping through the DV I imagine because I can’t hear it clearly anymore.

I can’t imagine how many people out there are driving around with torn DV’s completely unaware. My test – is it whistling loudly instead of pulling off & at around 2500rpm does it push you to the back of your chair or does it just lift a bit?

I ran my car through VCDS software and it came back with error code P0299 which is associated with low boost. I purchased the part from VW for €53 and fit it myself in around an hour.
Since I have a K03 my DV was located in behind the driver side wheel arch so this is how I replaced it.

Jack the car up as high as safely possible because you’re going to need a good bit of wiggle room. I then placed it on axle stands and chocked the wheels to be sure.

Remove the wheel and the plastic arch mud guards. There’s 2 of them and the one on the right hand side is also screwed onto the skid plate so you need to remove all of the screws at the front too.

The DV is located just inside the only bit of free space you can get to and I’ve circled it in the photos below.


A good tip is to get a small torch and tape it to one of the pipes so it’s not in your way but it’s providing you with better lighting. Will save time in the long run.
Start by removing the electrical connection. Prize clip up with flathead screwdriver and remove. Please do this safely or you’ll tear the wires. Now cable tie it to something higher so it’s not in your way.
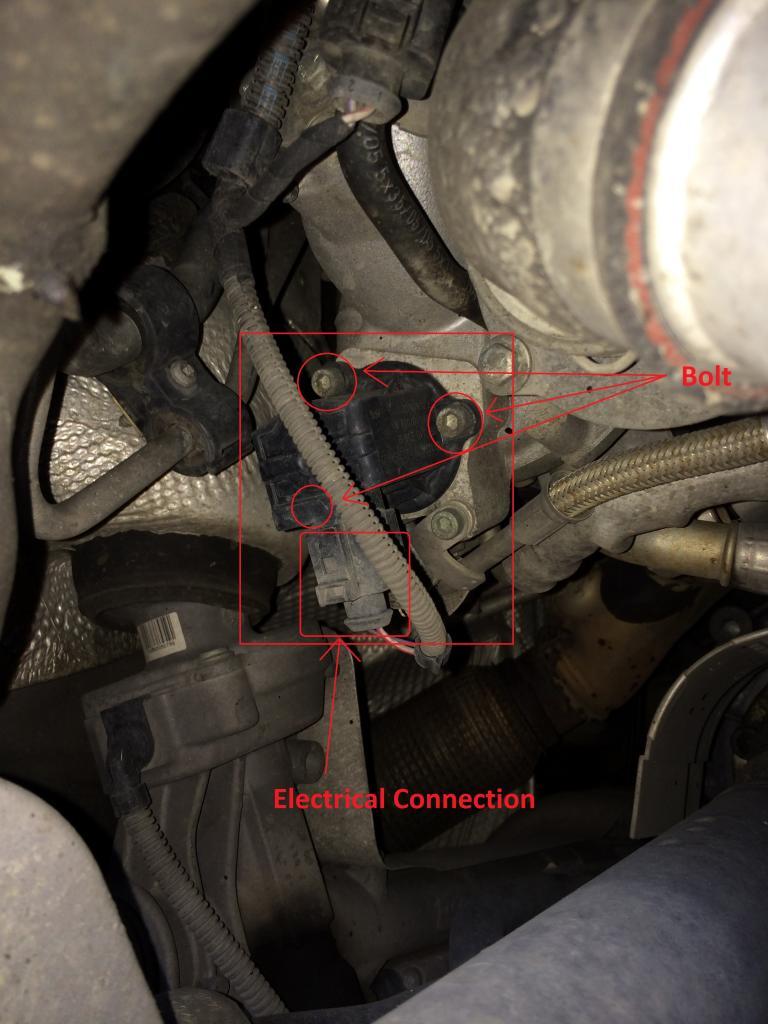


The 3 number bolts are held in place tight enough with threadlock – a glue put around bolts to keep them coming free from vibration so they require a bit more force to remove than a normal bolt would.
As long as you have the right tools all 3 bolts can be removed but you can’t tackle this with a  bit set and a screwdriver. You really need the extension pieces, right angle adapter etc. for your socket set. The area is also very tight so you’re going to need the socket set to be quite small.

When you get the DV off inspect the rubber diaphragm for tears and what revision it might be. As you can see, mine was torn badly and a revision B.
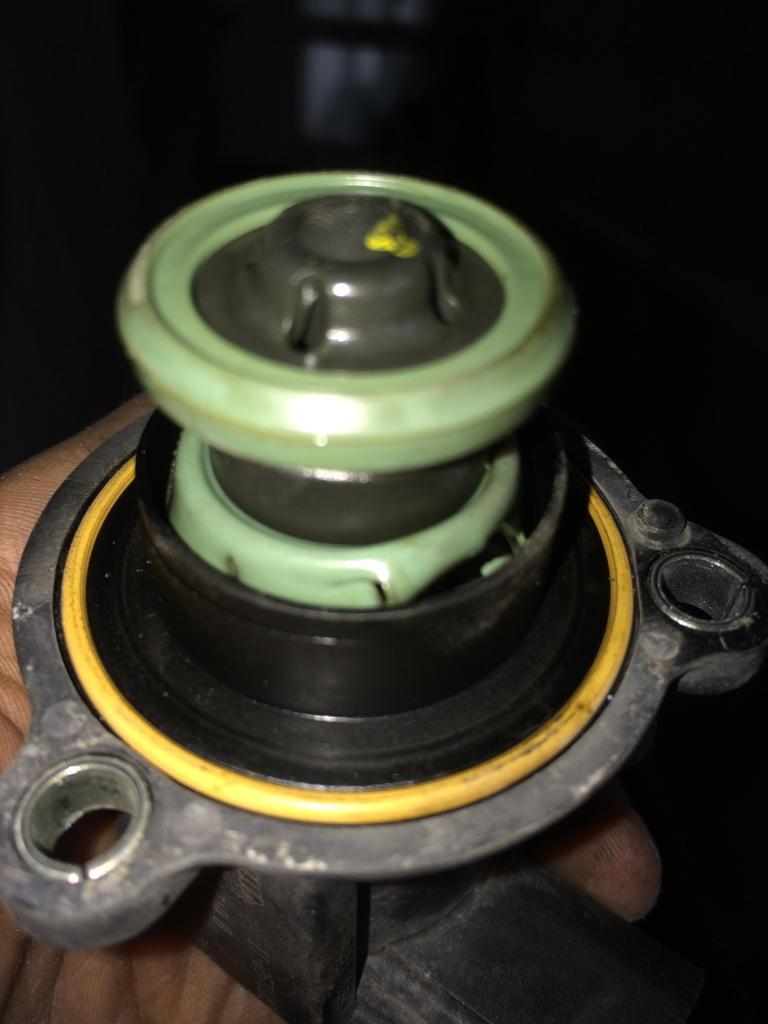
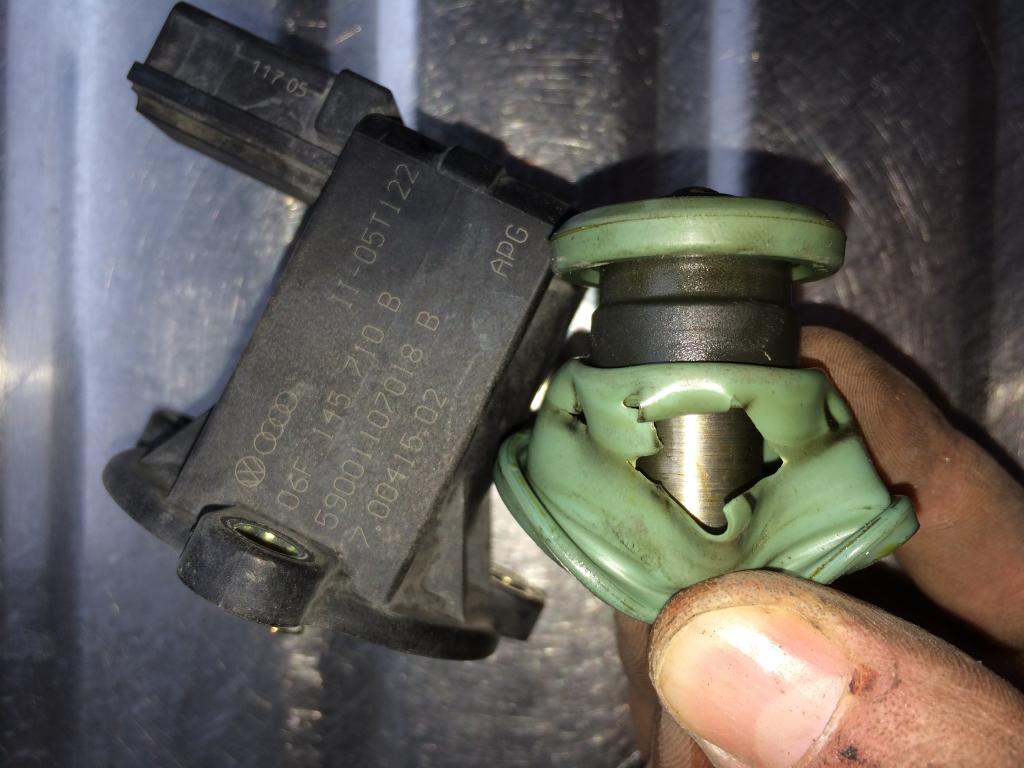


I replaced mine with a revision G. For the reinstallation start with the bolt on the top right corner. You’re going to need some fresh threadlock here on the bolts to keep them from coming out. Add a small amount and hold the DV in place with the first bolt. Don’t fully tighten until you get the other 2 bolts in.

Now fully tighten all 3 bolts and reconnect.

While you have this panel removed why not check your windscreen washer tank for dirt, your light bulbs need replacing? or your suspension need a look at?

Last but absolutely not least – clean the crap out of your panels now! I forgot to take photos but at the point where your side skirt meets your mudguard there’s a crevice there that can hold a mug full of sand/grit/leaves etc. Remove all of this junk and anything else that may have gotten behind the mudguard over the years. If you’re feeling fancy why not get the pressure washer out?

Now start putting it all back together. If you’re not sure where some parts/screws went you can walk over to the passenger side and use it for reference.

I got back in my car and I have to say I was happier about the car than I was the day I bought it. The power was like nothing I’ve ever experienced. The power is insane and I never even knew anything was wrong. I also know what symptoms to look for in the future so it ever did happen again I can fix it with ease.
« Last Edit: September 29, 2016, 12:37:45 pm by lukemk5gti »

Offline marko

  • Won't Shut up.
  • *****
  • Thank You
  • -Given: 16
  • -Receive: 34
  • Posts: 903
    • Email
Re: Diverter Valve How To With Photos on K03
« Reply #1 on: August 21, 2014, 09:45:54 am »
 :congrats: :congrats:
2007 TR gt170...heated leather,underseat drawers,auto-levelling bi-xenons,puddle leds,chrome switches,footwell lights f+r,cruise control and ed30 rear lamps,LED interior....carbon highline clocks,ed30 front spoiler,RNS 510 P+MDI,mk6 gti gearknob,TPMS done,complete r32 trim kit+ MFSW,r32 f+r brakes,RLS fitted.headlamp washers,folding mirrors and boot pop,mk6 RVC,19"Helios,AP coilies,valeo LEDs  ...dpf delete and remap to finish off

iDave

  • Guest
Re: Diverter Valve How To With Photos on K03
« Reply #2 on: August 25, 2014, 12:37:50 pm »
I have just changed mine over the weekend and was in the same situation not knowing it was knackered but thinking something isn't quite right!

Pulls so much better now and how it should be  :happy2:

Offline -Elliot-

  • Just Arrived
  • **
  • Thank You
  • -Given: 1
  • -Receive: 0
  • Posts: 23
    • Email
Re: Diverter Valve How To With Photos on K03
« Reply #3 on: August 27, 2014, 09:26:22 pm »
Decent guide, Will be following this on Saturday when I do my 'Big Service'!!

Offline usmangti

  • Always Involved
  • ****
  • Thank You
  • -Given: 23
  • -Receive: 28
  • Posts: 399
Re: Diverter Valve How To With Photos on K03
« Reply #4 on: August 27, 2014, 10:22:06 pm »
Excellent write up :congrats:
Thank you :happy2:

Offline GTI_Mike

  • Just Arrived
  • **
  • Thank You
  • -Given: 0
  • -Receive: 0
  • Posts: 10
Re: Diverter Valve How To With Photos on K03
« Reply #5 on: August 29, 2014, 07:36:50 am »
Thanks for this. Just ordered one so will come on handy


Sent from my iPhone using Tapatalk

Offline chris1440

  • Just Arrived
  • **
  • Thank You
  • -Given: 0
  • -Receive: 1
  • Posts: 18
    • Email
Re: Diverter Valve How To With Photos on K03
« Reply #6 on: September 08, 2014, 12:51:29 am »
Im getting mine changed wednesday.   I have exactly the same symptoms,  power dropped off, whistling, and same error code.  I can't wait to get it done.  Mine is a 55 plate gti with the axx engine.  I should be fitting the revision G right?

Offline lukemk5gti

  • Just look at my post count
  • ******
  • Thank You
  • -Given: 28
  • -Receive: 118
  • Posts: 1845
    • Email
  • My Ride: http://www.mk5golfgti.co.uk/forum/index.php/topic,89715.msg907250.html#msg907250
Re: Diverter Valve How To With Photos on K03
« Reply #7 on: September 08, 2014, 08:28:56 am »
Im getting mine changed wednesday.   I have exactly the same symptoms,  power dropped off, whistling, and same error code.  I can't wait to get it done.  Mine is a 55 plate gti with the axx engine.  I should be fitting the revision G right?

Some people say D and others say G.
I'm a K03 and I fitted G.

Why not do it yourself? Save a lot of money and also if and dare I say when it goes again you can tackle it yourself!

Offline chris1440

  • Just Arrived
  • **
  • Thank You
  • -Given: 0
  • -Receive: 1
  • Posts: 18
    • Email
Re: Diverter Valve How To With Photos on K03
« Reply #8 on: September 08, 2014, 02:04:12 pm »
I just phoned the vw dealer and gave my engine code and vin to see what part the comouter would come up with.  When I told him AXX he said yeah the G will fit.  Then when I said my VIN he said that the computer was saying that my turbo should have the D.  I double checked with him and am not confident really!
I should try doing it myself but I got a feeling it wont go smoothyl, jobs on the car dont usually when I do them!

Offline john87

  • Won't Shut up.
  • *****
  • Thank You
  • -Given: 11
  • -Receive: 53
  • Posts: 790
    • Email
Re: Diverter Valve How To With Photos on K03
« Reply #9 on: September 10, 2014, 09:59:03 am »
either D or G revisions will fit; I had both fitted to my mk6 Golf R which shares the 2.0 tfsi Engine.. rev G sounded better  :happy2:
VCDS Hex-USB +CAN (Central Scotland)

Offline lukemk5gti

  • Just look at my post count
  • ******
  • Thank You
  • -Given: 28
  • -Receive: 118
  • Posts: 1845
    • Email
  • My Ride: http://www.mk5golfgti.co.uk/forum/index.php/topic,89715.msg907250.html#msg907250
Re: Diverter Valve How To With Photos on K03
« Reply #10 on: September 16, 2014, 06:12:08 pm »
Just an update on this....

It's been a month since I made the guide and chaned my dv.

I haven't scanned yet with vcds but I notice my boost going!

Could it be split again already?

Offline Scottymon

  • Just look at my post count
  • ******
  • Thank You
  • -Given: 83
  • -Receive: 125
  • Posts: 2139
  • UnNaturally Aspirated
  • My Ride: http://www.voodish.co.uk/misc/6n/6n-alive1.jpg
Re: Diverter Valve How To With Photos on K03
« Reply #11 on: September 16, 2014, 06:46:47 pm »
Just an update on this....

It's been a month since I made the guide and chaned my dv.

I haven't scanned yet with vcds but I notice my boost going!

Could it be split again already?

yes, k03's with tune can split diaphragm DV's for fun.

Offline lukemk5gti

  • Just look at my post count
  • ******
  • Thank You
  • -Given: 28
  • -Receive: 118
  • Posts: 1845
    • Email
  • My Ride: http://www.mk5golfgti.co.uk/forum/index.php/topic,89715.msg907250.html#msg907250
Re: Diverter Valve How To With Photos on K03
« Reply #12 on: September 16, 2014, 07:03:29 pm »
My car is completely stock though and I'm not racing it like!

I bought it from Vw. You reckon they do warranty on parts?

Offline Scottymon

  • Just look at my post count
  • ******
  • Thank You
  • -Given: 83
  • -Receive: 125
  • Posts: 2139
  • UnNaturally Aspirated
  • My Ride: http://www.voodish.co.uk/misc/6n/6n-alive1.jpg
Re: Diverter Valve How To With Photos on K03
« Reply #13 on: September 16, 2014, 08:24:17 pm »
Why did you replace it?
Who replaced it?

Offline lukemk5gti

  • Just look at my post count
  • ******
  • Thank You
  • -Given: 28
  • -Receive: 118
  • Posts: 1845
    • Email
  • My Ride: http://www.mk5golfgti.co.uk/forum/index.php/topic,89715.msg907250.html#msg907250
Re: Diverter Valve How To With Photos on K03
« Reply #14 on: September 16, 2014, 09:20:44 pm »
Why did you replace it?
Who replaced it?

I wrote the how to!!!!

I replaced it myself because I got the error code and could feel no boost.

Bought part from Vw and for myself.